- Select the area to hide with the Pen Tool and make the Selection.
- Invert the selection
- Fill it with black color (Edit > Fill > Black).
Don’t be afraid to include hair in the selection, we will draw it later on.

Step 10
Go to File > Place and open the Moon stock. Put it below the Main layer and name it ‘Moon’. Go to Edit > Transform and scale it like in the figure below.

Step 11
Now go to Filter > Blur > Gaussian Blur and apply 8 px for the Moon Layer.

Step 12
Go to File > Place and open the Cloud stock. Place it between the Main layer and the Moon layer and name it ‘Cloud’.

Step 13
Now set the Cloud layer to Hard Light with Opacity and Fill at 80%.

Step 14
As you can see the edges of the Cloud stock is still visible. We will hide it with a Layer Mask (like we did with the Main layer). Add a Layer Mask to the Cloud layer. Take a soft brush and paint with black on the mask to remove the harsh line.

Step 15
Go to File > Place and open the Stars stock. (The layer goes above the Cloud layer).

Step 16
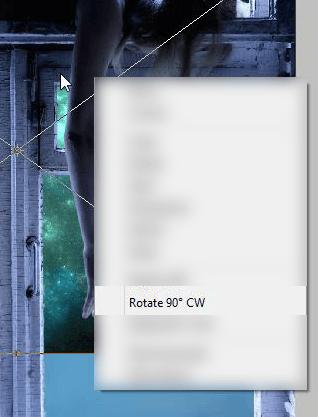
Right click on the image and choose Rotate 90° CW.


Step 17
Right click again on the image and choose Scale. Scale the image to fit the scene.


Step 18
Set the Stars layer to Overlay with Opacity and Fill at 80%.

Step 19
Go to Filter > Blur > Gaussian Blur and apply 5 px to the Stars layer.

Step 20
Let’s start to work on the colors and contrast. Add a Curves Adjustment Layer above the Stars Layer. Choose the ‘Medium Contrast’ Curve in the presets. The set the adjustment to Luminosity.


Step 31
Create a new layer and name it ‘Light & Shadow for the Sky’. Set the layer to Soft Light with Opacity 50%. With a big soft brush you have to paint some light in the middle of the sky and some shadows at the edges. For the light I used the color #e9eef1 and for the shadows #4d6da8. Below you can see where I painted them with the Layer set to Normal at 100% And then the result with the Soft Light layer.


Step 32
Add a Selective Color Adjustment Layer above the Stars layer with these settings:
- Cyans: -28 0 0 –13
- Blues: -35 0 0 –7
- Whites: 0 0 -59 –7
- Neutrals: +5 0 +14 0
- Blacks: 0 0 0 +6
This will fix color.

Step 33
Now we have to fix the Window and the Girl. Add a new layer clipped to the ‘Main’ layer and name it ‘Main fix’. Fill the layer with the color #4366a1.
TIP: To clip a layer or an adjustment to the layer below simply hold ALT and click on the line between the two layers that you want to “clip.”
4 responses to “Create a Wonderful Midnight Photo Manipulation in Photoshop”
-
wowww amazing work can u please upload psd for this workk
-
wow! Its a nice work…………thanks for sharing
-
Thanks a lot! Very helpful tutorial. Here is my result http://milanaserk.deviantart.com/art/Moonlight-482132626?ga_submit_new=10%253A1410640832
-
thanks alot!


Leave a Reply