
Now that your layer is rasterized, you won’t see the ![]() icon in the layer thumbnail. And because it is rasterized, we can apply filters and adjustments that aren’t available for smart layers.
icon in the layer thumbnail. And because it is rasterized, we can apply filters and adjustments that aren’t available for smart layers.

Step 5 – Create the displacement map
First we’ll use the levels tool to add contrast to the layer. With the top layer selected, press Ctrl+L or choose Image > Adjustments > Levels to access the levels tool. In the levels tool, drag the black input slider towards the right to increase the contrast until the background is black like the image below.

Now we are going to use the emboss filter to turn it into a displacement map that can be used with Photoshop’s displace filter. Choose Filter > Stylize > Emboss and use the settings as shown in the image below.

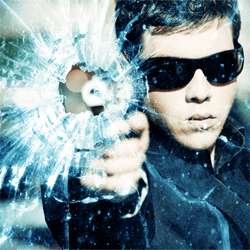
Here’s what the displacement map looks like:

Step 6 – Clean the displacement map
The displacement map looks great so far, but there are many errors on it. Shown in the image below is one of those areas where the bump map created a bump for a smudge that isn’t a bump on the glass. In this step, we’ll clean up those areas.

Start by changing the blending mode of the displacement map layer to overlay. This will let you see both the displacement map and the layers behind it and give you a slight preview of what the results will look like.

Set the foreground color to a 50% gray. Start by clicking on the foreground color in the tools palette. A color picker window will appear. Enter in 808080 in the # field to get a 50% gray.

Select the brush tool and paint over the areas that you want to remove the bumps from. The bumps in the areas you paint will be removed.

Here are the before and after results.

Step 7 – Save the displace map as a file
Change the blending mode of the current layer to normal.

Choose File > Save As and save the file as “displace map” on your desktop.

Step 8 – Delete the displacement map layer and convert the background layer into a smart object
Before we use the displace filter, delete the layer with the bump map texture then select the background layer.

If you are using Photoshop CS3 or newer, convert the background layer into a smart object. This will let you
apply filters as smart filters so that you can go back and adjust the filter settings anytime. To convert a layer to a smart layer, right click on the layer then choose Convert to Smart Object. You can also do this by choosing Layer > Smart Objects > Convert to Smart Object.
8 responses to “Gunshot Through a Glass”
-

can u share psd this link is not working
-
a very very very very thnx to u!!! most awsum tutorials!! so easy to go thru!! results : http://i.imgur.com/pFq4yjj.jpg
-
Great tutorial,with cool effects.thanks
-
nice
-
<3.<3
-
nice and easy tutorial for new photoshop user
-
Thank you! I just made it. :)
-
Thanks…
Leave a Reply