Activate the Blur tool (R) and input the following settings:
- Brush size: 35px
- Hardness: 0%
- Mode: Normal
- Strength: 100%

Next, blur the edges of the assassin as shown on the image below:

The result:

Next, we will enhance the color of this image to make it blend with the background.
Click on the “assassin” layer and then go to Image > Adjustments > Color Balance. Once this is open, input the following:
- Color Levels: +15, 0, -15
- Tone Balance: Midtones
- Preserve Luminosity: Check

The result of that color adjustment should be similar to this:

Next, we will enhance the shadows on the assassin. To start, create a new layer (Ctrl/Cmd + Shift + N) and name it “Darken”.
Put this layer above the assassin’s layer and right click on it and once the contextual menu is up, click on “Create Clipping Mask” so the paint would only be seen or “clipped” on the assassin. See images below:


Next, activate the Brush tool (B) and input the following:
- Brush size: 400px
- Hardness: 0%
- Opacity: 25%
- Flow: 100%
- #: 000000
- #: 000000 is the color black.
Once you’re done, let us now paint:

The result of that should be similar to this:

Select all the layers that we’ve created for this step and press Ctrl/Cmd + G. Name this group to: “assassin”.
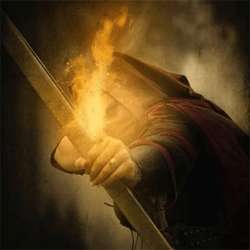
Step 4: Create the fire arrow
In this step, we will be adding flames to the assassin’s arrow rendering it more deadly and efficient. To start, let’s create a new layer (Ctrl/Cmd + Shift + N) above the “assassin” group and name it “fire 1”.
Next, activate the Brush tool (B) and input the following:
- Brush size: 600px
- Hardness: Default
- Opacity: 100%
- Flow: 100%
- #: fff992

Now, let’s paint:

The result of that should be similar to this:

Next, create another layer (Ctrl/Cmd + Shift + N) and then name it “fire 2”.
Now, we will be using the “Fire Brushes” by Skippy3E, so activate the Brush tool (B) and then right click on the canvas to activate the contextual menu. Once activated click on the drop down menu and click on Load Brushes.
![image015[1]](https://cdn.photoshoptutorials.ws/images/stories/e58f92b17ac9_11AA4/image0151.jpg?strip=all&lossy=1&webp=82&avif=82&w=1920&ssl=1 "image015[1]")

Once the Load Brushes option has been clicked, locate the “fire brushes” from the directory you’ve saved it into (as soon as you’ve downloaded it on the computer, its name will be changed to “assorted fire brushes by skippy3e”) and then click OK.
Now when you activate the contextual menu of the Brush tool (B), you’d see a bunch of fire brushes instead of the default circles.
Let’s activate this fire brush, now:
3 responses to “How to Create a Photo Manipulation of an Assassin with a Flaming Arrow in Photoshop”
-

My fiance would love this! She is fascinated by bows, arrows and assassins.
-
I just used other fire brushes and it turned out just as nice
-
Fire brushes do not exist any longer =(
Leave a Reply