- Brush size: 600px
- Hardness: 0%
- Opacity: 15%
- Flow: 100%
- #: 000000
Let’s paint:

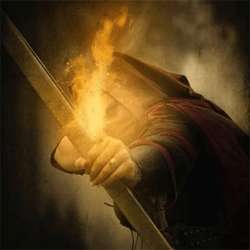
The result of that should be like this:

Step 6: Create a Vignette
In this step, we will learn how to create a vignette which will help enhance the focus on our subject. To start, go to the Menu bar and click on File > New and use the same settings we used to create our canvas. (Refer to Step 1).
Take note, the background contents should be: WHITE
Once it has been created, go to Filter > Distort > Lens Correction. Find the tab Vignette and use these settings:
- Vignette amount: -100
- Midpoint: +50

Now that that’s done drag the vignette to our canvas using the Move tool (V) and put it on top of all the layers that we’ve created, and then set the following:
- Blending mode: Multiply
- Opacity to 40%
To set the blending mode, simply click on the drop-down menu beside the word “Normal” on the top part of the Layer window. The Opacity is located just beside that drop-down menu as well. See image below:


The unblended vignette will look this:

The blended one will look like this:

Step 7: Add a grungy texture
Now, we will add textures to give the image an old and dark feel. To start, let’s open the stock image: “Grunge Texture 4” by darkrose 42 stock. Activate the Move tool (V) and drag that image to our canvas; put it above the Vignette.
Position it as shown below:

Activate the Transform tool (Ctrl/Cmd + T) and resize it as shown below:

Next, change the Blending mode of this texture to the following:
- Blending Mode: Soft Light
- Opacity: 40%

The result:

Next, duplicate the texture (Ctrl/Cmd + J) and use the following Blending mode for the duplicate:
- Blending Mode: Multiply
- Opacity: 100%

The result:

Step 8: Enhance the Light and Color of the overall image
Now, we will be adding some adjustment filters to enhance the overall appearance of the image. To start, let’s create a Gradient Map adjustment layer by pressing the “Create New Fill/Adjustment layer button”.

Once open, click on the following:


Change the Blending Mode and Opacity to the following:
- Blending Mode: Soft Light
- Opacity: 70%

Next, click on the “Create New Fill/Adjustment layer button” once again and then Hue/Saturation.

Once open, input the following:
- Edit: Master
- Hue: 0
- Saturation: +25
- Lightness: 0

Next, create a Solid Color adjustment layer.

Clicking the Solid Color option will open the Color Picker box. Once open, input the following on the #.

Next, change the Blending Mode and Opacity to the following:
3 responses to “How to Create a Photo Manipulation of an Assassin with a Flaming Arrow in Photoshop”
-

My fiance would love this! She is fascinated by bows, arrows and assassins.
-
I just used other fire brushes and it turned out just as nice
-
Fire brushes do not exist any longer =(
Leave a Reply