Step 23 – Color Adjustment
You’re going to change the colors so they’ll finally look like these on previous picture.
First add new adjustment layer Color Balance on the top of all layers and set it as you can see on the picture below.

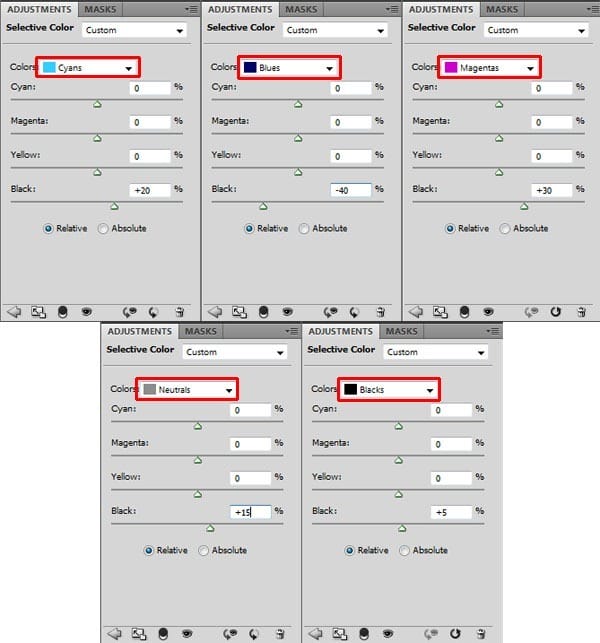
To make the colors even colder add new adjustment layer Selective Color on the top of all layers and set it similarly as below.

Let’s compare how these two adjustments change the image.

Step 24 – Sharpening
One last thing should be done – sharpening.
Select the whole picture the way you’ve done it in the step with Motion Blur. Press Ctrl + A to select the whole picture. Then press Ctrl + Shift + C to copy it merged and Ctrl + V to paste it. Place it on the top of all layers and name it SHARPENING.
Go to Filter > Other > High Pass and set the value Radius to be able to see gently edges of the picture. In this case set Radius on 1 pixel.

To blend it properly with the rest of the picture change its Blending Mode from Normal to Overlay.

Final Results
![final-results[1] final-results[1]](https://cdn.photoshoptutorials.ws/6149caae82ae_13637/final-results1.png?strip=all&lossy=1&webp=82&avif=82&w=1920&ssl=1)
Authors Comment
9 responses to “How to Use Light and Shadow to Create a Dramatic Photo Effect with Photoshop”
-
Thank you so much for this tutorial. I’ve read many tutorials about all of the tools you mentioned in this article, but I was never able to really grasp or truly understand the concept behind the tool. You have explained them in a way that really make sense to me!! And that is very much appreciated!
-
thanks a lot
-
thanks very nice.
-
Woow! I am very very impressed about your tutorial. With all your stuffs, i have no doubt am gonna be a pro in photoshop!
-
thats a wonderfull tutorial….thank u….
-
thanks wow nice
-
plz post a video tutorial….
-
Yes girl, nice job. Thanx
-
What a fantastic tutorial, covering so many aspects of photoshop. I’m now even more excited to learn the program. . Thank you! thank you! thank you!


 In this tutorial I wanted to show you how to blend easily more complicated materials such as glass to improve your manipulations and give you more possibilities what to do. You can follow more PS tricks on my blog “
Leave a Reply