
After loading the custom brush, you can now pick one of the brush. In this case, I used the ornament_texture2 brush. Select pink/magenta as the brush color’s, then click on the newly created document to make the pattern ( just one click ).

Save this document as a pattern by going to Edit > Define Pattern menu. Give it a proper name (mine is flowery) then back to lady rocker document and create a new layer between background and lady layer’s.

With the flowery layer’s selected, go to Edit > Fill menu (or simply press Shift+F5). In the Fill dialog, use Pattern as fill then select the flowery pattern. Make sure Opacity is set 100%, and now you can click OK. *Tadaa*.. your background now covered with flowery pattern!

On the flowery layer, change the blend mode to Multiply then lower the opacity to 50%. The pattern should blend nicely with the gradient now.

Step 3 – Motion Blur Effect
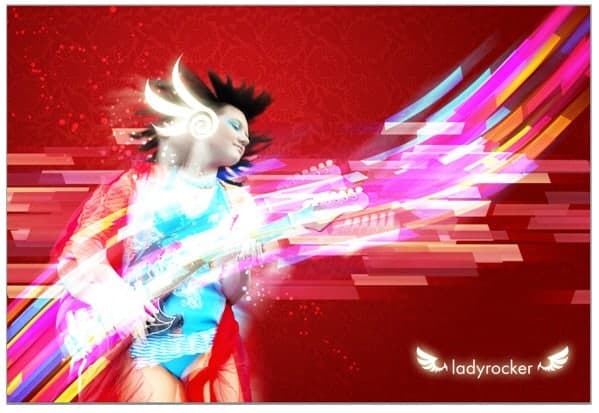
Duplicate lady layer. Rename the layer to lady 2 then change its Blend Mode to Screen. Now hit Ctrl+T to call the free transform command then skew the duplicated lady to left. Hit Enter to apply transformation.

Use soft round Eraser tool to erase some parts of the image (marked with yellow strokes in the screenshot below).

Duplicate lady layer’s once again. This time, drag the duplicated layer below the original lady layer’s. Rename it to lady 3 then change its Blend Mode to Screen. Hit Ctrl+T, then skew this image to right. When done, hit Enter to apply the transformation.

Erase some parts of the image (marked with yellow strokes) using soft round Eraser tool again.

Still on the same layer, go to Filter > Blur > Radial Blur. Adjust Amount value around 5 to 10 (mine is 8)then click OK. We’re done here, next to creating the color flow brush.

Step 4 – Drawing Color Flow Brush
Create a new document with 1500×300 px wide. Use Rectangle tool with Shape Layers ON to draw a black, long rectangle.

Add Gradient Overlay layer style to the shape layer’s. Use Reflected Style and increase the Scale to 150%. For the gradient color, we’re using combination of grey and black (the RGB color code can be seen in the screenshot below).
Leave a Reply