
Step 17 – Layer mode
Change layer mode to overlay.

Step 18 – Waterfall
Add a image of the waterfall and resize it to fit the mountain.

Step 19 – Layer mask
Use the layer mask technique once again to blend the waterfall.

Change layer mode to soft light

Step 20 – More Elements
Now add more elements to the image, can be mountains, castles, ruins, all of this to give to the image a better look. Use the layer mask technique you learned in the steps before in each of the elements and remember to change layer mode to soft light or overlay.

Step 21 – Add a Stone
Pick a stone stock and add to the image, resize it pressing Ctrl+T.

Step 22 – Select the stone
Now with the Polygonal lasso tool select the stone.

Step 23 – Layer
Add a layer mask to the image to have the selection.

Step 24 – Duplicate
Duplicate the layer pressing Ctrl + J and then change the layer mode to multiply with 60% of opacity.

Step 25 – Moss
Add a moss layer, create a layer mask and hide the undesired parts.

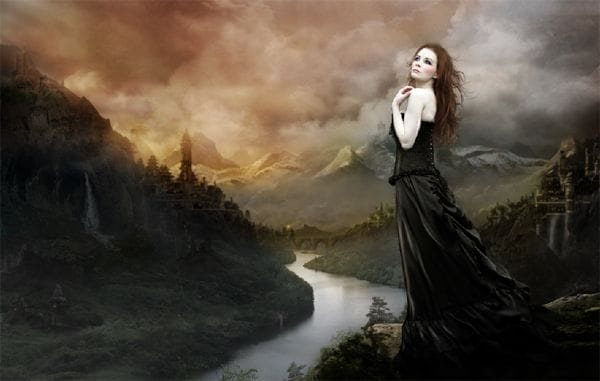
Result:

Step 26 – adjustments
Use the layer mode in soft light and reduce the saturation to -40.

Step 27 – Model
To hide the original background of the model, you have to use the polygonal lasso tool and select only the model.

Step 28 – Layer Mask
Now add a layer mask to the image, In that way the selection you made is going to be the only thing you see.

Step 29 – Dress
Duplicate the layer and select only the model’s dress using the same technique as before. Using layer mask and with the brush hide the undesired parts.

Step 30 –
Now go the the layer mask and choose the option add mask to the selection to have an editable layer of the dress.

Step 31 – Change size and color.
Now press Ctrl +T give a right click and choose the option warp to modify the dress, press enter when you are done to save the changes.

Step 32 – Converting
Convert the dress layer into a smart object pressing right click in the layer thumbnail and then selecting the option Convert Smart Object.

Step 33 – Black dress
To make the model’s dress black you have to reduce the saturation to -100.

Step 34- make up
Now for the make up I just paint over the model’s face with pink tones in the cheeks and lips and some brown in the eyebrows. Also add some eye shadows.

Step 35 – Hair
You can paint the hair with the help of some hair brushes pen tool or tablet.

Step 36 – City lights
Now to make the city lights, create a new layer and with a soft round brush paint to create lights. You can use the brush in 5 px or less.
41 responses to “Photoshop Matte Painting in Easy Steps”
-

Nice work. Well described.
-
please provide PSD file
-
give me link of mountain you are using.
-
Gracias Milady, woo this is awesome tutorial and easy to understand.
-
I don’t know where to find the background stock image. Pls help me..
-
Andrea this tutorial is awesome, thank u for sharing with us…
-
nice Beautiful work…
-
nice post it,like it.
-
supet
-
Many of the links for resources do not work. So I gave up on trying to do the tutorial. :-(
-
i loved it………………
-
Thank you,youre awesome
-
Thank you for your great tutorial. My try
http://tomaslepka.deviantart.com/art/Black-cat-408246603 -
I can’t not see your all works how can see your all works please help me and give me some trick how can improve my photoshop work I loved it your all work god bless you I hope you will rply me soon …………….
-
Step 44 -45 not clear, can work fine
-
Thanks for the comment! I agree with you that it can be confusing and I think I know why. In the previous step, your foreground color is probably black because you were painting with black. Set it back to white before you start Step 44.
After that, use the Freeform Pen Tool and draw the lines like shown in the image. Right-click on any one of the stroke and click on Stroke Path. Select Brush from the menu and make sure “Simulate Pressure” is turned on. If the highlights are too thick/thin, undo the previous step, select the brush tool, and change the brush size & hardness. Then redo the “Simulate Pressure” step. keep doing this to get the right stroke – sometimes it takes a few tries.
-
-
Very Nice Work
-
superb
-
Thanks for the tutorial, it was really useful! This is mine version:
http://silvialorica.tumblr.com/image/57968536296 -
so prefect! amagezine!!
-
Thank you for the tut! Here is mine http://sta.sh/02fvvyinn0t5
-
The BACKGROUND stock, which is not linked in the tutorial can be found here:
http://castock.deviantart.com/art/Lookout-misty-mountains-141109644
The CITY can be found on Pinterest:
http://pinterest.com/pin/327003622913465835/
Heres the CASTLE, I had to screenshot it from this tut:
http://imageshack.com/scaled/large/202/fjv.png
STONE is also screen shot, and you will need to do some cloning:
http://imageshack.com/a/img17/6544/g84u.png
MOSS is another screenshot, cloning required again:
http://imageshack.com/scaled/large/546/kvne.png
You can also google for a lot of good bridges and towers/ancient architecture.
-
I LOVE you! Thanks so much for correct links, you are so kind
-
-
The BACKGROUND stock, which is not linked in the tutorial can be found here:
http://castock.deviantart.com/art/Lookout-misty-mountains-141109644
-
Andrea your tutorials are some of the best, thank you Ms. Garcia.
-
Please fix the image links.
-
Fantastic work…i am designer and learning to create amazing moodboards..i cant find anything regards of moodboard tutorials, i hope to find it here:-) thanks very much
-
beautiful work and extremely appreciable, but could not understand the steps 34 and 34 (creating hair with the help of some hair brushes pen tool or tablet). If possible please elaborate which would be a help to beginners like me.
thanks and regards
-
Yeeea, just some of the pictures doesn’t exist anymore, i’d love to make this tutorial but unfortunately nobody can’t
-
Beautiful work, but when I tried to begin work on it I’m not able to access any of the pictures! Help!
-
I don’t know where to find the background stock image :'[
-
click the new..
-
-
Grande ottimo tutorial spero di riuscir a far qualcosa di vagamente simile ;) Great!!
-
Nice Tutorial. It gives a so much knowledge for photo-shop beginers Thanks for sharing your experiance.
-
Thank you for tutorial. Amazing work!
-
SIR,, FIX LINK PLZ
-
madam..excellent creative work nearly 50 steps to create that final image what a Patience. I am just beginner in Photoshop and its most helpful to me your working steps…thankyou
-
amazing and beautiful tutorial Andrea , thank u for ur time and effort , also
-
Andrea excellent tutorial, I admire your work very much you are very talent and an artist. Your friend José.
-
I like your tutorials but you have broken deviantart links. I much prefer stock that are not from deviantart because they disappear and the owners have usage rules that make them difficult to use.
-
I totally agree with you.
-
Leave a Reply