
Step 9
Now we need to erase the areas that the ray of light shouldn’t visible at. To do this, we’ll need to add a layer mask. Add a layer mask to the top layer (Layer> Layer Mask> Reveal All) and click on the thumbnail of the layer mask to ensure it has been selected.

Step 10
With the layer mask selected, use the Eraser tool (E) to erase the areas where the light shouldn’t appear.

Step 11
To emphasize the colors of the ray of light, use the Hue/Saturation tool (Image> Adjustments> Hue/Saturation or Ctrl+U) to increase the saturation. Before you can use the Hue/Saturation tool, you need to click on the thumbnail of the ray of light layer.

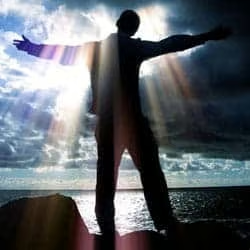
Final Results
Rollover the images below to see the before and after effect.

Final Results

Final results after further editing.
Questions and Answers
- How did you create the effect on the “final results after further editing” photo?
- Why does my Photoshop freeze when using the Radial Blur filter?
- What types of photos should I use with this Photoshop ray of light effect?
- I want to add more rays of light. How can I do that?
How did you create the effect on the “final results after further editing” photo?
- Select the ray of light layer and use the Hue/Saturation tool (Image> Adjustments> Hue/Saturation or Ctrl+U) to increase the saturation by 75.
- Add a Hue/Saturation adjustment layer (Layer> New Adjustment Layer> Hue/Saturation) above the background layer (between the two layers). When the Hue/Saturation tool appears, set the following properties:
Colorize: Checked
Hue: 200
Saturation: 25
Lightness:0
- Change the blending mode of the Hue/Saturation adjustment layer (middle layer) to Soft Light.
Why does my Photoshop freeze when using the Radial Blur filter?
Your Photoshop may just need more time to process the filter. The Photoshop Radial Blur filter is an intensive filter in terms of how many calculations it needs to do. The filter will take along time to process depending on your image size; the larger your image is, the more time it will need to process the filter.
What types of photos should I use with this Photoshop ray of light effect?
The best photos to use this effect with are photos with a visible light source (ex. sun, car headlight, fire, etc.) that’s partially covered by objects. Experiment this Photoshop effect on different photos, it may even give you appealing abstract results.
I want to add more rays of light. How can I do that?
After you’ve used the Levels tool to separate the bright areas from the photo (Page 1, step 4), use the brush tool to draw white lines where you would like the additional ray of light to appear. The thicker the line, the brighter the ray of light will be. After you’re done, continue with the rest of the tutorial.
7 responses to “Ray of Light”
-

Many Thanks. After Long Experiment With Many Sites I Found this One The Most Realistic. :-)
-
Sorry to say, this did nothing for me :/ I guess the light source has to be concentrated very strongly and in several areas for this to work. I used an underwater photo with the light source being the sun visible at the top of the photo. The sun was strong enough to make light rays in the original photo (I needed more, which is why I was looking at this tutorial) but not strong enough for the filter to do anything at all. Perhaps another time. Thank you for posting anyhow :)
-
slosh dattttttttt
-
Great tutorial, many thanks. Been trying to figure out an effective way to do this for ages. Thanks.
James. -
Awesome!!!
Thanks for sharing -
thanks so much for the tips, this will be an awesome piece!
-
this is the real stuff thats how we do it!!!!!
Leave a Reply