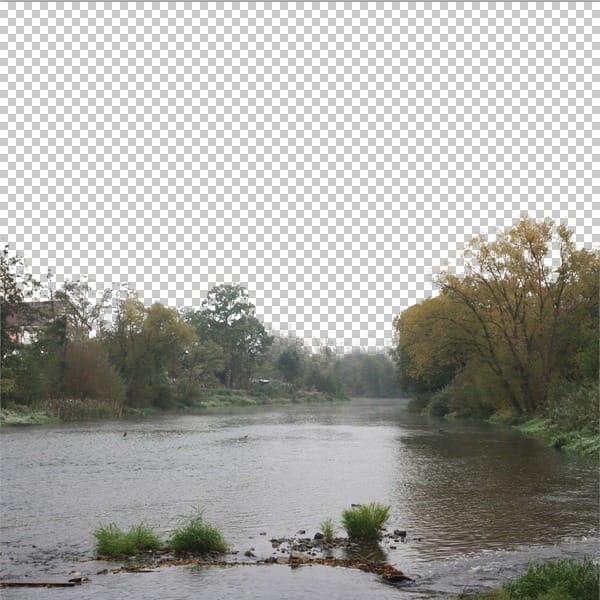
Thanks to it the sky disappears and you’re able to add another, more dramatic. Below you can see how the picture looks without the sky.

Step 2 – Removing the Cottage
There are fragments of the cottage in the left part of the picture and it doesn’t look nice.

To remove it grab the Brush Tool (B), select one of the round brushes and set the Hardness on 100%. Set the Master Diameter on 5 pixels. Higher the opacity of the brush on 100% too and pick black color.

Click on the layer mask, zoom in and paint over the cottage to make it invisible.

Step 3 – Adding the Sky and Mountains
This will be very quick step. Open the picture of sky and drag it into the manipulation. Name the layer SKY and place it under the BACKGROUND. Press Ctrl + T and resize it on proper size. Once you’re satisfied with the size press OK.

Open the picture of the right mountain, cut out the background and drag it into the manipulation. Place the layer under the BACKGROUND and name it e.g. RIGHT MOUNTAIN. Resize it on proper size.
Then do the same with left mountain.

Step 4 – Adjusting the Right Mountain
Right now the mountains doesn’t fit to the picture. The right mountain should have lower contrast, the left should be lighter and less saturated.
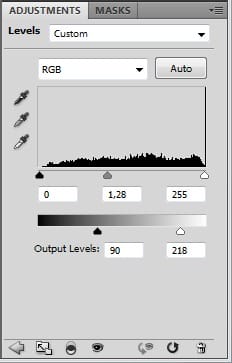
First let’s adjust the right mountains. Add new adjustment layer Levels above the RIGHT MOUNTAIN. You can find the button Create new fill or adjustment layer in the bottom part of the Layers palette.

Set the Input Levels of the adjustment layer on 0; 1,28; 255.

Right click on the adjustment layer and select the option Create Clipping Mask. This way the adjustment layer adjusts only one layer below – RIGHT MOUNTAIN and not the whole picture.
Step 5 – Adjusting Left Mountain
Let’s adjust the left mountain.
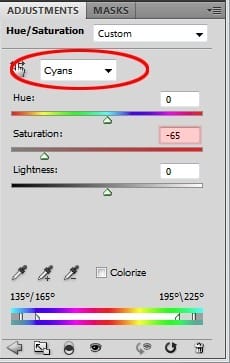
First lower the saturation. Add new adjustment layer Hue/Saturation above the layer LEFT MOUNTAIN. Select Cyan color and set the Saturation on -65. Create clipping mask from this adjustment layer.

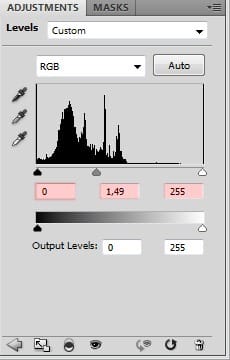
Mountains should be lighter because they are in distance. Add new adjustment layer Levels above the Hue/Saturation layer and set the Input Levels on 0; 1,49; 255. Create clipping mask from it.

Below it is shown how the image looks so far.
9 responses to “Serene Fantasy Photo Manipulation”
-
👏
-
I enjoyed this and my pic turned out great. Thank you!!!
-
I enjoyed this and my pic turned out great thank you!!
-
thanks a lot………………
-
Sorry guys figured it out. I pressed the mask button while i was still in the channels tab. Clicking layers and clicking on the image followed by pressing masks fixed it ;)
-
When removing the sky the sky turns darker, it doesn’t disappear. I tried using a white brush to see if it changes but it doesn’t. I am using CS6, can someone help. Thanks
-
Wow, I can’t thank you enough for making this tutorial of which I just completed. I made a couple of mistakes but I still love the final result. I have been using Photoshop and following many tutorials for over a year and did not learn as much as I did today with your one tutorial. Thank you, thank you, thank you : )
-
Very Nice!
-
very very good


Leave a Reply