Step 5 – Creating the waves
A sea without waves wouldn’t look or feel like a real sea right? So let’s add some waves on the walls to make it feel an authentic sea. Create a new layer, name it “wave1”. Activate your brush tool and replace it with the brush set: Waves Brush by anaRasha. When it opens, pick the wave brush which has a size of 600px. Press (D) to revert the foreground color and background color to its normal state which is black and white and then press (X) to revert back it to their original position. Now you’ll notice that you’d be using the color white for your brush. Press (B) again to activate the brush.
Use these brush values:
- Brush Opacity: 100%
- Set its size to 600px (default size of the brush that we’re going to use)
See image below for instructions:

Rotate the image by pressing Ctrl+T and clicking Rotate. Rotate it so it would be straight and aligned with the sea; right click on that selected area and stretch the image (press free transform and stretch it) so it would fit perfectly with our floor. Instructions are shown below:

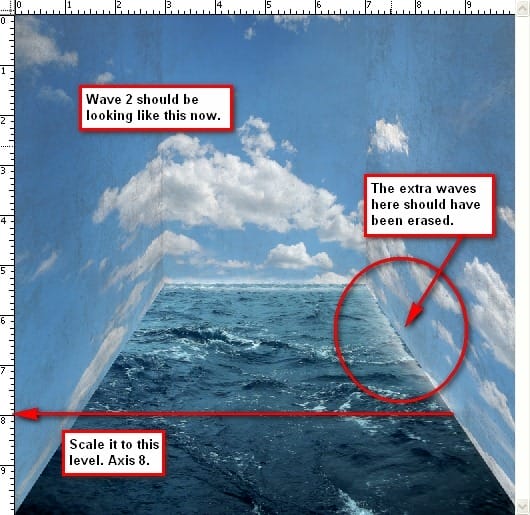
Next, let’s create a new layer for our new wave and name it “wave2.” We would be putting this on the right wall. In total there will be 13 waves. Activate your brush tool, make sure that the brush set you’re using is still Waves brush by anaRasha and click the wave brush with the size: 526px. Do not change the brush size, just use the default size and then brush it over the right wall, just beside “wave1.” Make sure to rotate it to be aligned with the wall.
Press Ctrl+T to transform it once again and this time click Scale, for we will be resizing it to be aligned until axis 8 of the left ruler. Just erase the unwanted waves that would appear. I would recommend using an Eraser Hardness of 0% and a Opacity of 100%. You can do that by clicking the Eraser tool or pressing (E) and then changing the Hardness to 0%. See reference below:

Create a new layer and name it “wave3.” Open your brush tool again and click on the wave brush which has the size 461px. Use the default size and brush it over the right wall just in line with “wave2.” (You can move it using the Move tool or V) Remember to erase the excess waves. See image below:
8 responses to “Surrealistic Room Photo Manipulation”
-
Psd pleasd not link
-
We have fixed the broken link. Thank you for letting us know.
-
-
Thanks a lot! Great tutorial and love your precise approach =) I modified final part, but love your original idea. Here is my version http://milanaserk.deviantart.com/art/Setting-Off-484852574
-
I searched a lot, but the Anarasha wave brush seems to be offline. But after some searching I found equally good wave brushes at this site:
http://midnightstouch.deviantart.com/art/Stormy-Seas-38507114
A lot more ‘water brushes’ can be found here:
http://www.photoshopfreebrushes.com/25-sets-of-high-quality-water-brushes-for-creating-splashing-backgrounds/Hope this will help!
Kind regards,
Mike -
very very nice, your picture works.thanks sir………..
sorif, -
the waves brush by anaRasha is not a working link. I’ve tried looking for it and it would be really cool for a different download or something like that.
-
Not sure if your aware theres a guy selling prints of your Tuts, I’m guessing without any permission?
-
Not sure if your aware theres a guy following your Tuts as finished artwork out there…I’m guessing without any permission?


Leave a Reply