

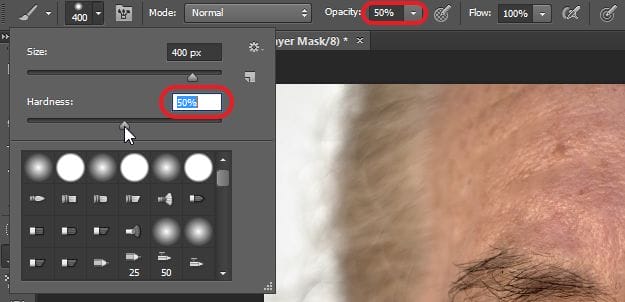
Step 13
Add an inverted layer mask to the group by holding Alt/Option and clicking on the Add Layer Mask button in the Layers panel or by going to Layer > Layer Mask > Hide All.

Make sure your foreground color is set to white then select the Brush tool. Using a soft round brush with an opacity of 50%, paint around the skin areas. Adjust the opacity of the group to fine tune the amount of airbrushing applied to your photo.
Step 14
Select the Eye Dropper tool then sample a color from the skin that you want to colorize the skin towards. Make sure that your eyedropper tool is sampling all the layers. Collapse the Airbrushing group then add a new Solid Color adjustment layer from your Layers panel or by going to Layer > New Fill Layer > Solid Color. It should have your foreground color automatically selected. Click OK. Change the blending mode of this layer to Color.


Step 15
In the layers panel, click on the layer mask then invert it by pressing Ctrl/Cmd+I.

Use your brush tool and start painting around the skin areas to equalize the skin colors. Adjust the opacity to fine tune this layer. When you’re done, rename the layer to Skin Color
Step 16
Next, we’re going to add a dodging and burning layer. For this step, we’ll be using another photo to better show you what you can achieve with this effect. This photo already has the previous steps applied.

Create a new layer then rename this layer to “Dodging & Burning”. Set the blending mode of this layer to Soft Light.

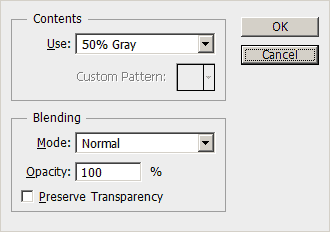
Step 17
Fill the layer with 50% gray. To do this, go to Edit > Fill and set the contents to 50% gray. Click OK.
Step 18
Select the burn tool and set the Range setting in the options bar to Midtones and exposure to 50% or less. Paint over the areas that you want to darken. To lighten, use the Dodge tool. Make sure that the Range setting is set to Midtones then start painting over the areas that you want to lighten. When you’re done with the dodging and burning, you can increase the strength by going to Image > Adjustments > Brightness/Contrast. Checkmark the “Use Legacy” option then adjust the contrast to get the effect that you like. You can also reduce the opacity of your Dodging and Burning layer to reduce the effect.
64 responses to “How to Retouch and Airbrush Skin in Photoshop”
-

nasty 🤢 🤮
-
Hey what’s the name of the lady on the photo one of my friends are interested
-
Creepy bro.
-
-
Hey what’s the name of the lady
-
Just amazing and its super and easy process for perfect image retouch., thanks boss
-
Great tutorial. I come back to this one every so often
-
Nice way to represent photo retouching
-
Portraits can be retouched in a number of methods.
-
One of the best tutorials about photo retouching with Photoshop… Great work ..
-
well that was one of the relevant guide on retouching
-
Hello
I m trying to install photoshop and illustrator cs5… but when i click on install it says
Windows cannot found
C:users-AppDataLocalAdobeOOBEPDAppDECoreSetup.exe. Make sure you can typed the name correctly, and then try again.Any one can help me sort it out
Regards
-
Wao for #biggners
-
Valuable Post !
-
Yup Indeed
-
+1
-
Yeah Agreed
-
Nice
-
U are awesome, u explain it so well Thanks a LOT FROM MADRID!
-
I’m having a few problems.
When you say:
Go to Image > Mode > CMYK. In the Channels panel, click on the Yellow channel. Copy this channel by pressing Ctrl/Cmd+A then Ctrl/Cmd+C.I can do this and when you say to:
Go to Image > Mode > CMYK. In the Channels panel, click on the Yellow channel.But I can not past the channel in layers.
Copy this channel by pressing Ctrl/Cmd+A then Ctrl/Cmd+C.I’m using CS5, Mac Book Air. Can you help me with this?
-
lol
-
this is so cool. However when I follow step 2 and 3, after cmd v the new layer is exactly the same as the original layer. what am I doing wrong?
-
please , can i get this action pdf file
-
It’s wonderful work specially on eyes. Thanks for sharing
-
I’m getting so annoyed of all these wannabe retouchers putting out tutorials and gimmick like tricks online. It’s all crap. You just need to use the basic tools and keep practicing. Most high end, WORKING, retouchers have never learned from these resources. Look at Bianca Carosio’s work for example, she’s self taught!!!! Just practice on your own terms people.
-
This is one awesome collection. One of my favorites I have seen in a long time. Thanks for sharing.
-
Awesome tutorial. Seriously, I have seen quite a few and this one is easily the best. This is what a tutorial should look like.
-
very nice
-
I like the tutorial….but
-
it not helpful. too complex!
-
your voice just AWESOME. l like your video.very nice video tutorial.thanks you for this.
-
very nice post.i learn more about retouching in this article thanks for share with us.
-
Hi, so i am fine on the first steps, but when it gets to the WRINKLES AND BLEMISHES layer, when i try to do this, wherever i click with the spot healing brush it makes it come up in a different colour?? Please help!
-
I amusing cs6,while retouching my ctrl shift z is not responding. Plztell me what can i do?
-
Nice tutorial.
-
nice tips
-
I really hate this tutorial, pls terminate this website
-
So I’ve used your tutorial for my first ever try at Photoshop – I’m not new to photo editing but new to this program – so picked up most of what was in this tutorial. However, I went to edit a previous layer and it deleted all the layers after that one, and I can’t get them back. How do you ‘merge’ layers, so to speak? I think I have a long way to go with this program, or maybe actually need a ‘for Dummies’ book on this because I feel this tutorial is written for people that already know how to work the program in certain aspects. A little more detail on how to save would be good for people like me who are looking to move from Corel’s Paint Shop pro X5 Photoshop…
-
Thank you so much. I got beautiful results!
-
grate tutorial!
-
having a problem with the airbrushing. after I group the details and smoothness layers and add a mask, I then selected a brush tool with opacity of 50%. the airbrushing is not working I see no adjustments at all. I went back and followed the steps again about three times and I am not getting any results. what am I doing wrong
\
-
having a a problem with the airbrushing- after i group the smoothness and details layers,add a layer mask and rename to airbrushing then i select the brush to airbrush the skin with a soft brush opacity 50% but I am not seeing any airbrushing. what am i doing wrong I completed all the previous steps as directed
-
Thank you! Super Helpful :)
-
授人以鱼不如授人以渔,i like this tutorial ,tks~!
-
Very cool, I use madian sometimes, also grey channel
Great work, love the retouch
Maya Kreskin -
Thats cool, how did you do that before and after sliding?
-
They used this one here: http://www.catchmyfame.com/2009/06/25/jquery-beforeafter-plugin/
-
-
AWESOME video tutorial! Just one thing! When you say CTRL+C then CTRL+Z, they sound almost the same so you should use ZED instead of ZEE even if you are Amurrikaa
-
I like video
-
Interesting and nice tutorial. The final results look blurry and very fake.
-
Interesting tutorial thank you. What is the point of creating the flaws layer if you will be removing all the wrinkles and airbrushing later? Is it not redundant?
-
Thank you for the tip. As a beginner these type of video helps new jacks understand what PS has to offer.
-
As a follow beginner I have to ask you how the hell those something that’s end product looks fake be off any value?
-
-
Your voice sounds so good!!
-
You cannot simplify the steps into a 10 minute video with shortcuts. High end retouching is an ART that takes years to master. I spend at least 2 hours per photo and I know that you cannot retouch it in 10 minutes. You might think that your doing the world a favor with this video, but you are only springing up more faux-retouchers who dilute the jobs and put the real beauty & fashion retouchers out of business.
-
Sorry but I don’t think any “faux retouchers” can actually put you out of business. I know that sounds harsh but if you’re really that good, then you wouldn’t be effected by them.
-
jealous….jealous everywhere
-
Hi I’m only starting to learn photoshop and can only do the basics of the basics for really slow and stup beginners. Enough of me I don’t know much but I can see from a mile away the end product looks fake so sorry but a quick short cut ten minute so called tutorial are useless if the end product looks fake. Btw I didn’t even try this tutorail because I want to learn about photoshopping that’s end product looks like the real deal and not supper doeper fake!
-
I can only agree with you! This is, i’m sorry – but horrible. The goal within ‘high-end retouching’ is to make the skin look ‘perfect’, if there is such a thing.
This tutorial (i didn’t even look thru it, saw the ‘result’ which was enough) isn’t going to help anyone.
Using the old ‘Gaussian Blur’-retouch method would be adviced before using this tutorial, and the ‘Gaussian Blur’ method is somewhat.. bad.
I’m not just going to complain, as it will serve no purpose at all. Instead, i wan’t to help you out, to become better.
So, my advice, google for ‘Dodge and burn’. That’s the method we use when retouching for magazines or w/e.
It takes time, just like Valen says. Some images can take more than 2 hours.
If you are going to do it – do it right! =)
-
In reply to Valen: I am a full-time professional fashion and editorial photographer and I agree with you that it is possible to spend hours on a photo. But you should not discredit this tutorial in that manner.
I have read through this tutorial thoroughly and watched the video and I have nothing but compliments for the author. The video was outstanding and the author has the best voice and clear instructions. If the instructions are in question, then my suggestion is to try it out for yourself.
I know many of these techniques already. It is the basic high and low pass retouching that “every” professional retouching artist use. They briefly go through dodging and burning too. But the video is fast-forwarded. I think they should teach more about dodging and burning but it is hard to describe because every photo is different.
In reply to Nick: Your comment doesn’t make sense. Maybe you didn’t see the next page? The last photo on this page is blurry but it is not the final image. Click on Page 2 to see the results. There is “no” gaussian blur used here. Dodging and burning is taught here too. There is a Next Page button which you should click.
-
-
how do you post a comment
-
lolwut
-
-
I can’t see the video…. It says ‘This video is private’
-
Sorry about that! Video should be working now :)
-
Leave a Reply