

Step 11
Next, we need to create a shadow, hold Ctrl/Cmd and press create a new layer icon. Then use a Brush Tool(B) Soft Round with foreground color black and start painting the shadow but first drop a flow to 10%.

Step 12
Now create another shadow, select Butterfly layer and duplicate it (Ctrl/Cmd + J) then go to Image > Adjustments > Hue/Saturation and put Lightness to -100.


Step 13
Next, select Butterfly layer and create a new Adjustment Layer “Hue/Saturation”
Step 14
Add Adjustment Layer “Curves”
Step 15
Add Adjustment Layer “Curves”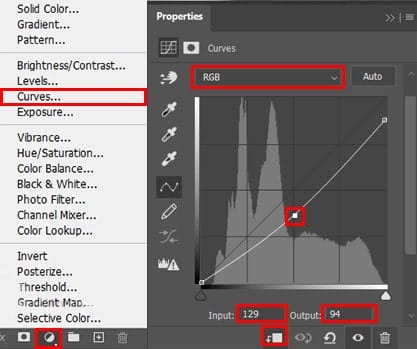
Step 16
Next , we will add some lights to butterfly. Create a new layer and create clipping mask, then use Brush Tool(B) Soft Round with foreground color white and paint over the Butterfly. Reduce the Opacity to 18%.


Step 17
Now make a copy of a group (Ctrl/Cmd + J) and select Bear then go to Filter > Distort > Displace and open a PSD we created (Displace). We repeat this process so that the copy of the butterfly has a reflection in the water.
Step 18
Let’s add some Ivy, Go to File > Open and Select Ivy. Hold Ctrl/Cmd and click on layer and after the selection area has been created, simply copy (Ctrl / Cmd + C) and Paste (Ctrl / Cmd + V) it to our work canvas. Then position the image with the transform tool (Ctrl / Cmd + T). Hold Alt + Shift and resterize like image below. In Photoshop CC only hold Alt to resterize al sides together. Now add some blur, go to Filter > Blur > Gaussian Blur and set Radius to 35px.

Step 19
Add Adjustment Layer “Hue/Saturation”
Step 20
Open another ivy vine and hold Ctrl/Cmd and click on layer and after the selection area has been created, simply copy (Ctrl / Cmd + C) and Paste (Ctrl / Cmd + V) it to our work canvas. Then position the image with the transform tool (Ctrl / Cmd + T). Hold Alt + Shift and resterize like image below. In Photoshop CC only hold Alt to resterize al sides together. Now add some blur, go to Filter > Blur > Gaussian Blur and set Radius to 35px.5 responses to “Create a Photo Manipulation of a Polar Bear”
-

Thank you tutorials
-
Lol. I think Claus needs to work on his intelligence and do his own research. Oh yeah that’s right the world is, once again, about to disappear, might not have the time OMG.
Awesome work thanks. -
Really !! Polar bear are doing fine???? Wake up man.
-
How beautifull!! Epic work
-
Very well done . Thanks for sharing .
Leave a Reply