


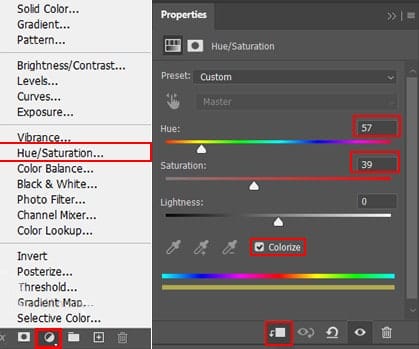
Step 8
Add Adjustment Layer “Hue/Saturation”

Step 9
Add Adjustment layer “Solid Color” and use color code #0f0801. Blend mode change to Soft Light with Opacity 55%.

Step 10
Add Adjustment Layer “Hue/Saturation” then select all layer (Hold SHIFT and select first and layer layer) then press Ctrl/Cmd + G to put in all in group.
Step 11
Add Adjustment Layer “Gradient Map” and blend mode change to Hue with Opacity 40%.

Step 12
Add Adjustment Layer “Color Lookup” 3DLut Filet select “Kodak 5205 Fuji 3510” Opacity reduce to 75%.

Step 13
Next, create a Underwater scene. First go to File > Place and select Underwater. Place it and position the image with the transform tool (Ctrl / Cmd + T). Hold Alt + Shift and resterize like image below. In Photoshop CC only hold Alt to resterize al sides together. Blend mode change to Hue with Opacity 100%.

Step 14
Go to File > Place and open Bermuda, place it and position the image with the transform tool (Ctrl / Cmd + T). Hold Alt + Shift and resterize like image below. In Photoshop CC only hold Alt to resterize al sides together. Blend mode change from Normal to Overlay with Opacity 100%.


Step 15
Next, Go to File > Place and open Bubbles stock photo. Place it and position the image with the transform tool (Ctrl / Cmd + T). Hold Alt + Shift and resterize like image below. Create layer mask and use Brush Tool(B) Soft Round with foreground color black and start painting left corner like as image below. Blend mode change to Hard Light.


Step 16
Go to File > Place and open Texture, place it and position the image with the transform tool (Ctrl / Cmd + T). Hold Alt + Shift and resterize like image below. In Photoshop CC only hold Alt to resterize al sides together. Blend mode change from Normal to Soft Light with Opacity 50%. Now we’re done with Underwater and need to blend with the rest of the picture. In the next couple of steps we will use a little more Adjustment Layers.


Step 17
Now select four Underwater photos and put in group (Ctrl/Cmd + G) and add Adjustment Layer “Gradient Map” with blend mode Multiply.

Step 18
Add Adjustment Layer “Gradient Map” Blend mode set to Soft Light with Opacity 90%.
3 responses to “How to Create a Creepy Radioactive Water Scene in Photoshop”
-

big thanks for your tuto
just a problem with link psd
-
Looks like I forgot to upload the PSD. Thanks for letting me know! The download link should be working now.
-
-
just a problem with link psd :)
Leave a Reply