
Select with the Lasso tool
The Lasso tool is useful for drawing freeform segments of a selection border.
- Select the Lasso tool
 , and set feathering and anti-aliasing in the options bar.
 - To add to, subtract from, or intersect with an existing selection, click the corresponding button in the options bar.Selection options
A. New B. Add To C. Subtract From D. Intersect With - Do either of the following:
- Drag to draw a freehand selection border.
- To switch between freehand and straight-edged segments, press Alt (Windows) or Option (Mac OS), and click where segments should begin and end. (To erase recently drawn straight segments, hold down the Delete key.)
- To close the selection border, release the mouse without holding down Alt or Option.
 Selection options
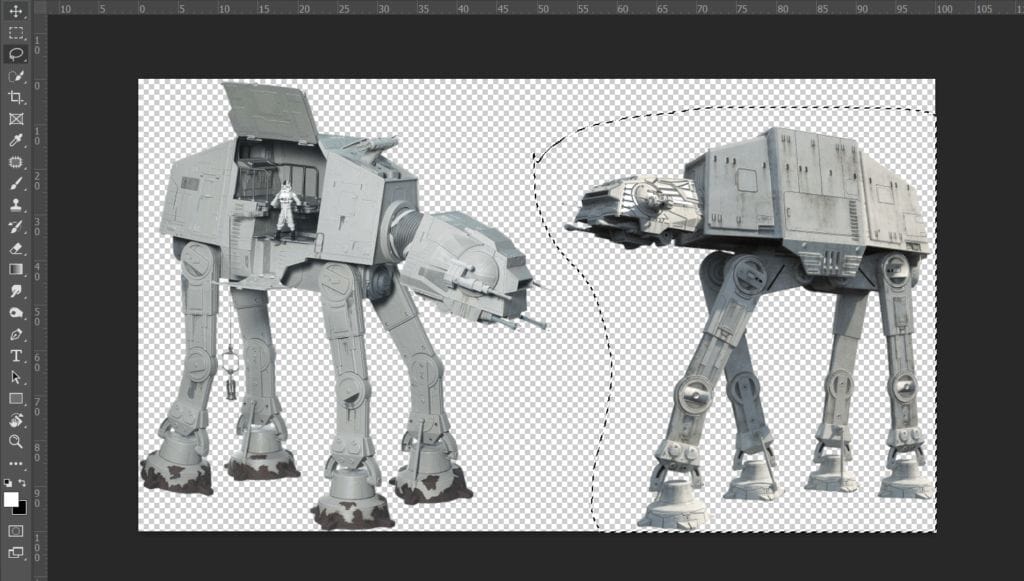

Step 18
Add Adjustment Layer “Color Balance”

Step 19
Add Adjustment Layer “Hue/Saturation”

Step 20
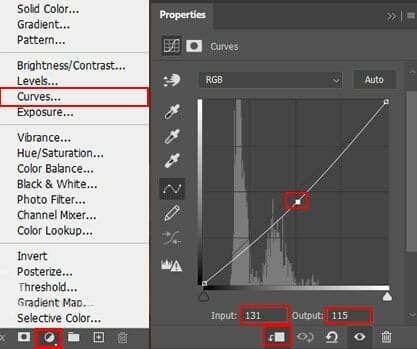
Add Adjustment Layer “Curves” and press Ctrl/Cmd + I to invert and use Brush Tool(B) Soft Round with foreground color white and paint the upper part of the robot.

Step 21
Add Adjustment Layer “Curves” and press Ctrl/Cmd + I to invert and use Brush Tool(B) Soft Round with foreground color white and paint the robot…

Step 22
Go to File > Open and select Robot 2/3. After you open the image, use Lasso Tool(L) and select robot 3 (on left side) After the selection area has been created, simply copy (Ctrl / Cmd + C) and Paste (Ctrl / Cmd + V) it to our work canvas. Then position the image with the transform tool (Ctrl / Cmd + T). Hold Alt + Shift and resterize like image below. In Photoshop CC only hold Alt to resterize al sides together. Opacity set to 25%.


Step 23
Add Adjustment Layer “Color Balance”

Step 24
Add Adjustment Layer “Exposure”

Step 25
Add Adjustment Layer “Hue/Saturation”

Step 26
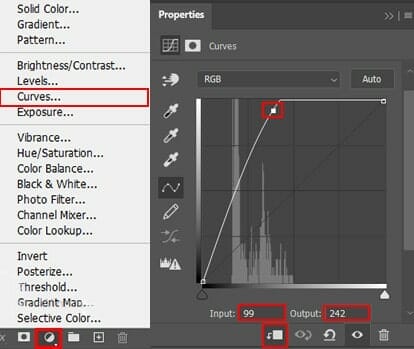
Add Adjustment Layer “Curves” and press Ctrl/Cmd + I to invert and use Brush Tool(B) Soft Round with foreground color white and paint the upper part of the robot.


Step 27
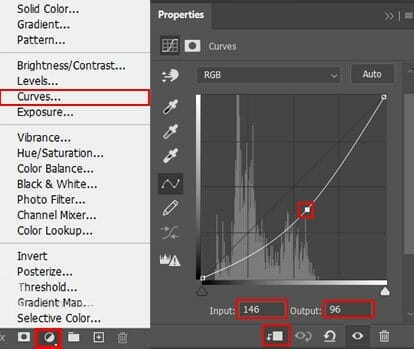
Add Adjustment Layer “Curves” and press Ctrl/Cmd + I to invert and use Brush Tool(B) Soft Round with foreground color white and paint the robot…

Step 28
Next, open texture. Go to File > Place and select Texture then place it to our work canvas. Then position the image with the transform tool (Ctrl / Cmd + T). Hold Alt + Shift and rasterize like the image below. In Photoshop CC only hold Alt to rasterize all sides together. Blend mode change from Normal to Screen with Opacity 25%.


Step 29
Add Adjustment Layer “Hue/Saturation”

Step 30
Add Adjustment Layer “Levels”

Step 31
Next, we need fog/clouds for brush but first we need to import brushes. Select a Brush Tool(B) and right click on background. Now click on the gear icon and Import Brushes (Select a downloaded brush).


Step 32
Create new layer and use Brush Tool(B) right click and open Clouds folder. Flow set to 10% and start painting fog. Foreground color set #8a4636 and Opacity of layer to 75%.
9 responses to “Create a Star Wars Scene Photoshop Tutorial”
-

HI why are the colors red and the file i downloaded it is blueish? i followed the steps for changing colors with adju layers but wont get it redish. Please explain? i mean if you download een blueish file and yours is read somehow the outcome will be different then yours.. and that is really frustrated when you follow a tut step by step :)
-
Which step are you on?
-
-
Why do i get a different color then your Mountains? I changed the color and added the adjustment layers but didnt changed a thing with the colors how come? I mean i download the file from mountains and that is blueish not red … and even with the changes you made it wont become red… Did i mis something?
-
Does anyone know if this tutorial is good? I’m at step 5 and struggling to understand what it’s asking me to do. If anyone has already beat this challenge please let me know, it would help wonders.
-
Hey Student,
I’m currently up to step 21, and have found the tutorial becomes a lot easier to understand. My design currently looks spectacular, and this ‘challenge’ has almost been conquered. I truly believe if you put your mind to this, then you can do it.
With the kindest regards,
Another Student -
Yeah I agree with everything you just said whole heartedly
-
-
Meh
-
meh
-
-
Looks good thank you
Leave a Reply