")
Repeat the process. This is going to be a two fold process. First time we need to get every single segment filled and have them on separate layers. Then we work around each character and make them more vivid and bright. A thing about layer order, Don’t get confused with so many layers. Proceed with it anyway that makes sense to you and as long as it works.
")
")
")
")
Repeat the process to complete the remaining letters.
")
")
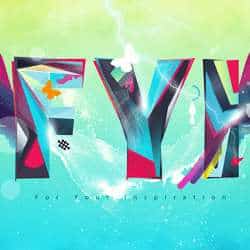
Step 4 : Adding More Details and Colors
Here we have the solid color version of the design. Let’s see what we can to improve it.
")
We will apply different shades to the pieces. We can do this using the Brush Tool and isolating the transparent pixels of the layer. Check the Lock Transparent Pixels option on the Layers palette. This will limit the brush strokes to the existing pixels.
")
Then I added some more segments.
")
Lock the transparency and apply color.
")
As you can see this time I made a selection to apply color in a new layer despite using the existing layer below. But it will add some extra layers. However There is no definite way to go about this. The whole process is intuitive than a set of predefined steps. Basically we are adding darker and lighter tones to give depth to the letters.
")
")
Adding some interesting shapes. Here I drew an oval, filled with a nice pink and deleted the portion I don’t want.
")
")
")
Continue to add more details
")
")
")
")
Use Pen Tool to create similar shape.
")
Here I added sharp highlight filled with white.
")
Now we have pretty much completed the first letter. But the letter shape is still too defined. We need to induce some randomness that will give character to it. Make a selection on the edge and fill it with solid color. Don’t make a perfect selection keep it a bit irregular. Lock the transparency of the layer and add more shades. Keep these layers out of the clipped stack.
")
Let’s move on the next letter in order.
")
")
Here I recolored the piece which I wasn’t satisfied with. Lock the transparency and press Alt+Backspace to fill the color.
")
More shades and details.
")
")
Work on the Edges.
")
Let’s finish the final letter.
")
")
")
Step 5 : Creating Vector Line Work
That’s fine so far. The text is perfectly made up. Now we can add some line work to it using Illustrator. To do this save a copy of our image as JPEG. Open it in Illustrator. Lock the image layer in the Layers palette. Crete a New layer above the image.
21 responses to “How to Create a Colorful Text Design in Photoshop”
-

Really nice work and thanks for the PSD file.
-
Only few artists share their tricks of the trade. You’re one passionate artist that believes in “share your blessing” motto. :-)
-
It’s truly a great and helpful piece of information. I am happy that you shared this helpful information with us. Please stay us informed like this. Thank you for sharing.
-
Its not my first time to pay a visit this website, i am visiting this site dailly and get good data from here every day.
-
It’s truly a great and helpful piece of info. I’m happy that you just shared this helpful information with us. Please keep us informed like this. Thank you for sharing.
-
AMAZING!!
-
Download link not working… 404 Error .
-
Fixed thanks!
-
-
… Honestly This should be named “how to collect textures to create a design” because nothing named design over here
-
oh my god what the patient artist
thank you for your article!
its very help full
i learned some more tips and tricks from it
:D -
I really appreciate your struggle in this tutorial…!! lovely text effect.. so shared it..
-
It’s amazing!
-
Hi,
how can i apply line tool on the duplicate layer??
should I rasterize vector mask..because i cant simply draw the lines and they goes to new layers when i draw them.. -
This is wow.
Thank you so much -
Hey, I’m starting learning Photoshop lately :)
but I’m stuck at step one hhhh
I don’t know what is ” illustrator ” , but when I try to write the letters in Photoshop then try to create outlines it doesn’t work :(
so, can anyone help me please :) ??
Thanks in advanced.-
only illustrator can do ths work…
-
It’s a whole other program. sorry dude.
-
-
This is wow.
Thank you so much for creating vivid tutorials for free. :) -
very bad
-
thank you so much! This was exactly what I was looking for.
-
page of the wings is not
Leave a Reply