
Learn a quick and easy way to create reflective plastic text in Photoshop from scratch. Three layer styles will be combined to achieve this effect. We will also explore blending modes and their effective use to achieve this type effect with layer styles. Same effect can be use on shapes also because of its simple and highly customizable nature.
Preview of Final Results
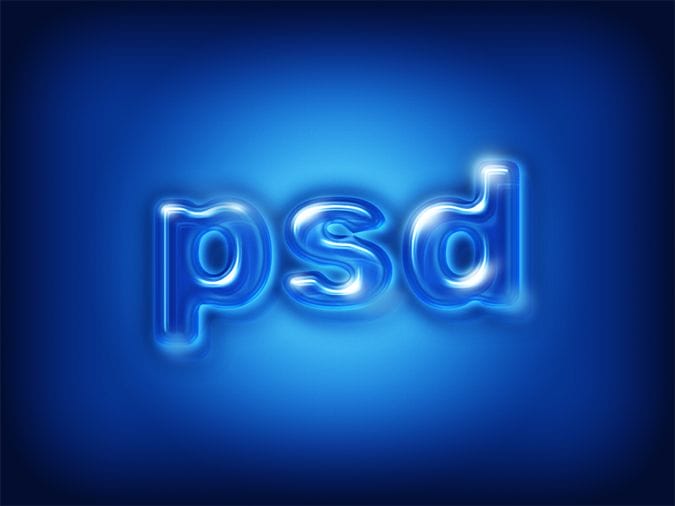
Glossy Plastic Text Photoshop Tutorial
Step 1
Open a new file in Adobe Photoshop with the following settings.

Step 2
Select Type Tool (T) and in the Option Bar select Arial Black, 325 pt, smooth. Then type the word “psd” in lower case.

Step 3
Change the tool into Move Tool (V). Then in the Layer palette left click on background layer to target that layer. Now press shift from the keyboard and left click on the Type layer. Alignment buttons will be active in the Option bar when more than one layer is selected. Then click on the Vertical Centers and Horizontal Centers buttons to center align the type layer.

Step 4
Create a new layer by clicking on the Create a new layer button below the Layer palette and fill it with white color. Target both the new layer and the type layer by using the shift click method. Then use Menu > Layer > Merge Layers to merge them into a single layer.

Step 5
For creating a reflective glossy plastic text effect we need a bold or chunky round corner type face. Because round edges catch more light than the corner edge. But edges of Arial Black are corner not round. So let’s explore a quick and easy technique to change any edge from corner to round. First on “psd” layer apply Filters > Blur > Gaussian Blur (Radius: 8 px).

Step 6
Then on the same layer Image > Adjustments > Levels. In the Input Levels area drag the Left (Shadow) Input Slider to the right and the Right (Highlight) Input Slider to the right. This will remove or rather convert the resulting grey blurry area produced by the application of Gaussian Blur and change that area into solid black. Due to that the corner edges are now rounded.

Step 7
Select the Magic Wand Tool (W) and click on the black area of the “psd” layer to select the black text. Selection active, create a new blank layer on top of the “psd” layer by clicking on the Create a New Layer button below the Layer Palette. Then fill the selection with 50% gray and also rename the layer as “base style”. Deselect by Select > Deselect or press Ctrl + D.
29 responses to “Quick-Tip: Create Glossy Plastic Text in Photoshop”
-

Awesome tutorial very clear and easy to follow, explains everything very useful.
-
Picture number two (2) on page two (2). It says color RGB(255, 255, 255) but on the image it’s blue.
-
Completely confusing!
-
not clear and incomplete……….
-
thanks .i am waiting for a tutorial like this .i did like this
-
Excellent post. Thanks for sharing……….
-
Tis is good
-
I LIK DIS TUROTIAL BCUASE IT MDE SHNY THNG
-
Glossy text effect is very impressive and you made this task look very easy with nice screenshots and clear description. Keep posting more of them.
-
yea i need more unique effects please help
-
Wow SAMA, it’s not just photoshop what you cann´t use. English language is not one of your skills either.
-
This tutorial was terrible! Half of it doesn’t make sense and it’s not very clear! I got to step 7 and couldn’t do anymore because it wasn’t clear enough, then tells me to delete the text layer. WTF?
-
its good work.
-
YOW TONY COME BACK.. THIS IS BERY USFUL BECASE I DOT KNO JAW TO USE FOTO CHOP
-
this is very good thanks toni
-
Really superb…… very simple steps… and easy to understand…
thank u very much….
-
confusing
-
OK
-
-
Very nice. I try this & make similar.
Thank you very much. -
This is a great tutorial!! However I realized too late that it doesn’t work on text that are too long. Anyone trying this should stick with 3 letter text or less. The issue starts when you do the blur and levels… it turns it into a blob-by illegible text.
-
yeah, i do the same with you, and i realized that is doesnt work on my text. “SMARTCLOTH” or ” CHAPTER K” haha. but its fantastic tutorial i think. :)
-
Thanks good to know
-
-
Excellent – well laid out and a great result – thanks!
-
very cute tanq
-
amazed. thanku
-
Thanks! Here is how mines ended up looking:
http://screencast.com/t/wfX6FYaTfotThe soft glow part was the hardest.
-
Fantastic result.
-
Good job!
-
How do you do this? It doesn’t work for me!
-
Leave a Reply