Step 41 – Text
Using a font of your choice, although I strongly recommend an outline font like I used, type either TRON, or AEVION, or whatever you want inside there, and center it.
![Picture 35[6]](https://cdn.photoshoptutorials.ws/images/stories/TRONGrid_2FE2/Picture356.png?strip=all&lossy=1&webp=82&avif=82&w=1920&ssl=1 "Picture 35[6]")
Step 42 – Text
Go to Filter > Pixelate > Fragment.
![Picture 36[6]](https://cdn.photoshoptutorials.ws/images/stories/TRONGrid_2FE2/Picture366.png?strip=all&lossy=1&webp=82&avif=82&w=1920&ssl=1 "Picture 36[6]")
Step 43 – Text Glow
Double click on the text layer, and set the blending options to what you see below.
![Picture 37a[6]](https://cdn.photoshoptutorials.ws/images/stories/TRONGrid_2FE2/Picture37a6.png?strip=all&lossy=1&webp=82&avif=82&w=1920&ssl=1 "Picture 37a[6]")
![Picture 37b[6]](https://cdn.photoshoptutorials.ws/images/stories/TRONGrid_2FE2/Picture37b6.png?strip=all&lossy=1&webp=82&avif=82&w=1920&ssl=1 "Picture 37b[6]")
Step 44 – Checkpoint
You should see something like this now.
![Picture 38a[6]](https://cdn.photoshoptutorials.ws/images/stories/TRONGrid_2FE2/Picture38a6.png?strip=all&lossy=1&webp=82&avif=82&w=1920&ssl=1 "Picture 38a[6]")
Step 45 – Lens Flare
If you don’t have one of these like I did looking back at my old layers palette, make a duplicate of the flattened lens flare (“lens flare copy”). Move it to the bottom of the text like you see below.
![Picture 38b[6]](https://cdn.photoshoptutorials.ws/images/stories/TRONGrid_2FE2/Picture38b6.png?strip=all&lossy=1&webp=82&avif=82&w=1920&ssl=1 "Picture 38b[6]")
{end}
Step 46 – Text Reflection — A
Duplicate the text layer. Hit (control/command + T), and right click to flip the text upside down (vertical).
![Picture 38c[6]](https://cdn.photoshoptutorials.ws/images/stories/TRONGrid_2FE2/Picture38c6.png?strip=all&lossy=1&webp=82&avif=82&w=1920&ssl=1 "Picture 38c[6]")
{articlead}
Step 47 – Text Reflection — B
Move it down like you see below, so that it looks like a reflection.
![Picture 39[6]](https://cdn.photoshoptutorials.ws/images/stories/TRONGrid_2FE2/Picture396.png?strip=all&lossy=1&webp=82&avif=82&w=1920&ssl=1 "Picture 39[6]")
Step 48 – Text Reflection — C
Move the reflection layer below “layer 1”, or whatever layer name you have that has a blue gradient on it. Set the reflection layer’s opacity to 50%.
![Picture 40a[6]](https://cdn.photoshoptutorials.ws/images/stories/TRONGrid_2FE2/Picture40a6.png?strip=all&lossy=1&webp=82&avif=82&w=1920&ssl=1 "Picture 40a[6]")
![Picture 40[6]](https://cdn.photoshoptutorials.ws/images/stories/TRONGrid_2FE2/Picture406.png?strip=all&lossy=1&webp=82&avif=82&w=1920&ssl=1 "Picture 40[6]")
Step 49 – Finishing Touches — A
Go back and find your original and upright text layer. Turn on the visibility of that black layer (if you deleted it, just make another, and put it right underneath the text layer) and put it underneath the text layer. Click on the text layer in your palette, and then hit (control/command + E) to merge the layers. You should see this below:
![Picture 41[6]](https://cdn.photoshoptutorials.ws/images/stories/TRONGrid_2FE2/Picture416.png?strip=all&lossy=1&webp=82&avif=82&w=1920&ssl=1 "Picture 41[6]")
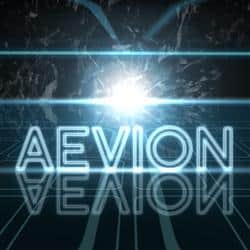
Step 50 – Finishing Touches — B
Set the blending mode for this layer to “linear dodge (add)”. Then your text should really glow. And then you’re done.
![Picture Final[6]](https://cdn.photoshoptutorials.ws/images/stories/TRONGrid_2FE2/PictureFinal6.png?strip=all&lossy=1&webp=82&avif=82&w=1920&ssl=1 "Picture Final[6]")
Step 51 – Conclusion
Congratulations, you’ve reached the end of the tutorial! I hope you understood what was going on, and enjoyed learning about this effect as much as I did teaching it. I encourage you to keep playing around with this effect, practice the techniques, and try to improve on areas here and there that you think could use improvement. It is all up to you as the artist — good luck!
Below are two versions of this finished effect that I’ve done.


Download the PSD (25 MB)
5 responses to “TRON Grid”
-

Hide the path key is ctrl +H, not shift + H
-
Thanks for your correction! You’re right – it is Ctrl+H. I’ll update the tutorial with the proper hotkey.
-
-
When I fragment the font, it looks really bad.
like this:
http://i61.tinypic.com/2cctpg9.png -
This is an extremely well written tutorial and well laid out graphically, wish more were like this, thanks!!
-
very good, and easy explanation. thanx
Leave a Reply