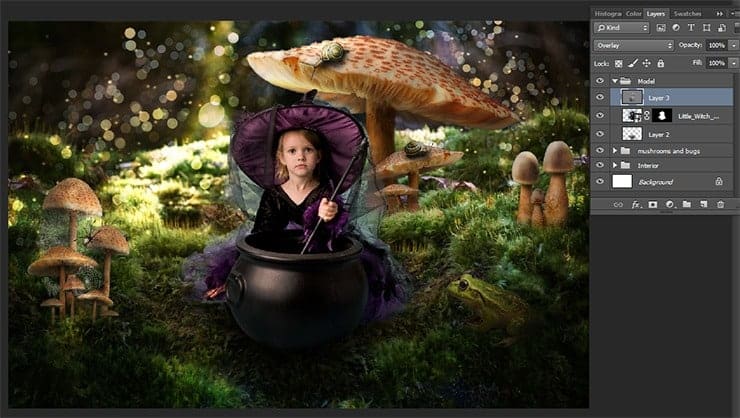
Add to that the layer mask and you remove all unnecessary background. It should you get.

Step 32
Create the shadow of the kettle and girl. To do this create a New Layer (Cmd/Ctrl+ Shift + N) and place it under the layer with the model.

Take a Brush Tool (B) and set there settings: Size: 900px, Hardness: 0%, Opacity: 40%, flow: 100%. Make shadow. Near of the kettle the shadow will be more, and the edges of model dress less.

Step 33
Now we need to make the right lighting model to fit her into the general atmosphere. Create a new layer use the short keys Cmd /Ctrl+ Shift + N.
![59[1] 59[1]](https://cdn.photoshoptutorials.ws/wp-content/uploads/2014/07/591.png?strip=all&lossy=1&webp=82&avif=82&w=1920&ssl=1)
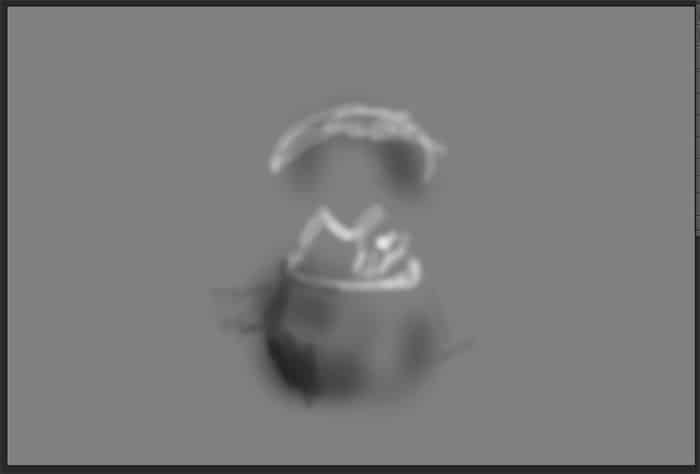
Use the Dodge Tool (O) for make light and Burn Tool (O) for shadow. Draw light and shade as shown in Figure. Note that I lightens it as out of the kettle is light. For example, a hand with a magic wand, edge of hat, neck and edge of kettle. This layer should be higher than the model layer. All the layers of the model I have combined into one group “Model”.


Step 34
Now the fun part! Now we will create a brush from the stars. In Photoshop are many brushes that few know (except for professionals). Now you find them and convert it! Go to Brush Presets. In the upper right corner there is an icon settings, click on it and then select the “Assorted Brushes”. In the window that appears, if you click Ok brush replaced, and if Append then brushes added to the Brush palette.

Now find a star brush in tab “Brush”. Set on the main tab Size: 40px, Spacing: 32%. So the stars are not so thick, which would make dispersal. Go to tab “Shape Dynamics” and set Size Jitter: 83%, Angle Jitter: 13%, Roundness Jitter: 56%, Minimum Roundness: 25%. This values represents the minimum size of the stars, slightly tilted and perspective stars.

Go to Scattering tab and set Scatter: 1000%, Count: 1. This parameter is responsible for the the scatter stars.

Tab Color Dynamics responsible for the color of the brush and change it. Set the Hue Jitter: 29%, Saturation Jitter: 16%, Brightness Jitter: 2%. So the stars will be a different color, brightness and saturation. In tab Transfer set Opacity Jitter: 70%, Flow Jitter: 89%. So the star will not be the same. This creates an effect of depth. Be sure to check the box on Smoothing to change stars color and “blended with the background”.
23 responses to “Turn Baby Photo into a Fairy Tale “Queen of Fungi” Composite”
-
did phone until I got to the star brush tutorial – that was it, the instructions were not in line with photoshop at all
-
Great tutorial!
-
Thank you for all your hard work and the wisdom you shared.
-
Thank you for all you hard work and the wisdom you shared :)
-
Why isn’t this tut visible? Post is two days ago but the comments dates are from 2014?
-
laborious lesson.It takes many time and a lot of effort to achieve a good result. Thanks for lesson
-
wove
-
Nice technique. Really useful…thanks for the post…
-
I like the idea of this tutorial, it’s very creative and the result looks great
-
Very creative and professional design.
-
Thank you very much! I do it.
-
спасибо за красивые уроки!!!!!!!!!!!!
-
Спасибо большое! Так приятно знать, что они понравились и ,надеюсь, полезны. Уже прочитали их? :) Скоро будут новые уроки! Если у вас будут вопросы, то пишите мне и я с радостью помогу вам.
-
-
Thank you for sharing this great tutorial well explained and I liked perform:
http://cartes-mireilled.eklablog.com/photomontage-magique-reine-des-champignons-a108935666-
Thank you very much! I am very pleased! I tried :) I really appreciate it! :D Unfortunately your link does not open. I would be happy to look your work!
-
-
Nice job
-
Thank you very much! I really appreciate it! :D
-
-
Really Nice.Thanks to share this Tutorial.
-
Thank you very much! I really appreciate it!
-
-
очень красивый урок!!!!!!!!
-
Спасибо большое! Мне очень приятно!:)
-
-
nice
-
Thank you very much!
-


Leave a Reply