In this tutorial, I’ll show you how to create a fantasy scene featuring a little fairy girl and a butterfly with leaf wings. First, we’ll add the background and change its color. After that, we’ll import the butterfly, flower, child and make the leaf wings. Later, we’ll create the light, enhance the color and make some fantasy effect. We’ll use several adjustment layers to enhance the final effect.
Preview of The Final Result

Tutorial Resources
Step 1
Create a new 2204×1666 pxdocument in Photoshop and fill it with white. Open the background image and drag it into the white canvas using the Move Tool (V)or use your own image. Place the highlight of the image in the top middle and convert this layer to a Smart Object.

Step 2
Go to Filter > Blur > Gaussian Blur and set the radius to 15 px. This step is to separate the backgroundfrom the main subjects to increase the depth of the scene. The radius depends on the images you ‘ve used and the size of the main document.

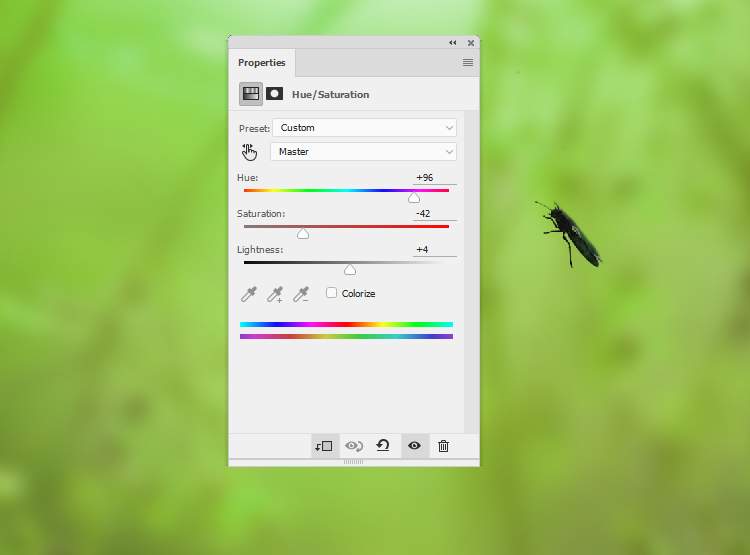
Step 3
Go to Layer > New Adjustment Layer > Hue/Saturationand set it as Clipping Mask. Change the Mastersettings:

Step 4
Open the butterfly image and use the Lasso Tool (L)to select a suitable one from the image to add to the main document (here is the one I’ve chosen). Use the Free Transform Tool (Ctrl+T)to rotate it as shown below and flip it horizontally (Edit > Transform > Flip Horizontal) . Place the butterfly in the area near the top middle.


Step 5
Click the second icon at the bottom of theLayerspanel to add a mask to this layer. Hit Bto activate the Brush Tooland select a hard round one with black color to erase the wings.

Step 6
Make a Hue/Saturationadjustment layer (set as Clipping Mask) and alter the Mastervalues:
Step 7
Create a Color Balanceadjustment layer to make the butterfly brighter and more green.

Step 8
Add a Curvesadjustment layer to bring more light and dreamy effect to the butterfly. On this layer mask, use a soft black brush with the opacity about 20%to reduce the light and effect on its body.


Step 9
Make another Curves adjustment layer to make the upper of the butterfly’sbody brighter. On this layer mask, use a hard black brush to paint onthe lower so it won’t be affected by this adjustment layer.
4 responses to “How to Create a Fantasy Fairy Scene Photo Manipulation with Adobe Photoshop”
-

Thanks very much!
-
wow great results
-
Neat image! Thank you!
-
WOW ist das schön, vielen Dank für das gut erklärte Tutorial.
Leave a Reply