
Download Lightroom presets and LUTs, absolutely free. Use the presets to add creativity and style to your photos.
In this tutorial I'll show you how I created my Invasion movie poster in Photoshop. For quite some time now I wanted to create an action-movie poster tutorial and I thought this would be the best time to do so. It is a lengthy tutorial and I have worked a few days on this tutorial so I really hope some of you find it useful! Continue reading to see the final image and learn how you can create a movie poster from just a few images!
“Invasion” Movie Poster Photoshop Tutorial
Resources
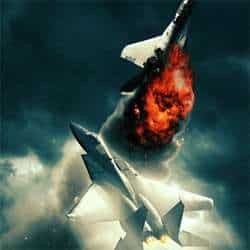
Final Image

Step 1
Open up Photoshop and create a new Document of 2270x3450 and click OK. Open the Cloud image and scale it down (Ctrl + T) so that it fits the canvas. Create a new layer and name it 'Color_Gradient' and set the Layer Mode to Color. Select the Gradient Tool (G) and set a grey-ish green color (#58686b) as the foreground color and a marine blue color (#394f61) as the background color. Drag the Gradient Tool (G) from the bottom left to the top right.

Create a new layer and name it 'Billing_Block_Shadow'. Grab a Soft Round Brush of any size and start painting the bottom of the image black. Set the Opacity to 50%.

Step 2
Now we are going to add a whole bunch of color correction layers. Create a new Group and name it 'Color_Correction', add a new Curves Adjustment Layer and go to the Red and Blue Channel and try to simulate the settings shown below. Leave the Green Channeluntouched.


Add a Color Balance Adjustment Layer by clicking on the, as I'd like to call it 'Yin-Yang' button in the Layer Menu. By default, the Color Balance menu will open in the Midtones Channel. Set the Cyan color level to +60, Magenta to +4 and the Yellow Channel to +10. Go to the Highlights Channel and set the first level to -37, set the second channel to -3 and the third channel to +1. Drag this Adjustment Layer underneath the Curves Adjustment layer.

Add a Photo Filter Adjustment Layer and select the Deep Yellow preset. Keep the Density at 25% and check on Preserve Luminosity. Drag this Photo Filter Adjustment layer underneath the Color Balance Adjustment layer.

This next layer will be our noise layer which will help blend all of the images together. Create a new layer, name it 'Adjustment_01' and fill it with a grayish-black (#222222) and set the Layer Mode to Screen. Go to Filter>Noise>Add Noise, set the Amount to 7%, set theDistribution to Gaussian and check on Monochromatic. Create another layer, name it 'Adjustment_02' and fill it with a bright blue-ish color(#17d7ff), set the Layer Mode to Color and the Opacity to 15%. At this point of the tutorial, you should have a result similar to the image below and your layers should be kept as shown below.
2 comments on “How to Create an Intense Movie Poster in Photoshop”
the links don't work :( i really want to do this tutorial :> thanks!
just great...