
Welcome! Today we’re going to be looking at some methods and techniques to composite a si-fi crash site scene. I’ll be talking though selecting stock photos, lighting methods, and extraction methods for things like smoke. This kind of imagry is great for backgrounds but mostly these techniques will help you expand your own toolbelt to create more advanced and interesting work!
What you’ll be creating
This peice was created as an exercise in landscape imaging. Its something I’ve always wanted to try my hand at and hopefully can share some experiance about. I used Photoshop CS6 but for the most part any recent version should work with these methods. FIrst I’ll give a little info on how I like to extract things and a little bit about my workflow. Then I’ll talk about how I handle more complex cutouts like the smoke and fire. Then finally I’ll go a bit into my mastering workflow. There are a lot of different ways to go about giving your work that extra “pop” but hopefully mine will give you some ground to stand on. I also try and use stock photos that are free so that everyone can follow along properly. However I do use paid stock in this, so I will suggest some places where you can find similar pic’s to use.

Tutorial Resources
- Rock Bridge – Free Images
- Mountain – Free Images
- Hikers – Free Images
- Heli – Free Images
- Clouds – Free Images
- Fire – Free Images
- Fire Texture – Free Images
- Smoke – Deposit-photos
- Snow – PSDBox
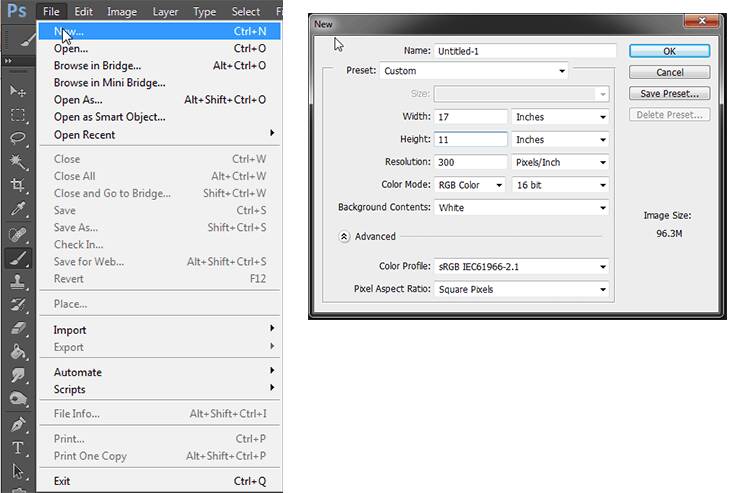
Step 1
Lets start out by making a new document, File > New. When it comes to sizing I like to use pretty standard stuff just for ease of printing later. Also just a tip if you’re just starting out, always try and work in 300 Pixels/Inch or above, its easy to scale down later if you need too but will usually look bad trying to scale up at lower resolutions.
Step 2
Go ahead and bring in the first stock we’ll be using here, the hikers. It’s a fairly large image yet still low resolution as if it was scanned from a old photo at one point. But with some techniques we can still work with it. I like it for its great sense of scale and the leading line the hikers provide for us right off the bat.

Step 3
So lets get into cutting out that mountain and sky in the background. For more control we want to put in our own so things all blend nicely. First with the layer selected we want to go too Layer > Layer Mask > Reveal All. This will give us a mask to work with on the layer (the small white box next to the thumbnail in the layers palette) By selecting that rather than the thumb you can draw the opacity using Black and White brushes. However for this tutorial I’m going to assume you’re pretty comfortable with how masks work and we will be using them for every image from here on out.
5 responses to “How to Create a Cinematic Snowy Mountain Crash Site Scene in Photoshop”
-

some pict are missing
-
this is boring
-
Some links of the images are down…
-
It is professionnel
-
is there any tutorial for it ? i will try for sure .
Leave a Reply