

Make your artwork look like they're from an alternate universe. These Cyberpunk presets work with Photoshop (via the Camera Raw filter) and Lightroom. Download all 788 presets for 90% off.
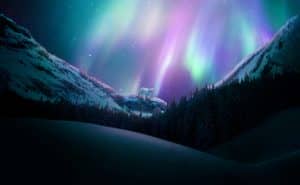
In this tutorial I'll show you how to create a winter night landscape featuring a northern sky. You will learn how to combine different stocks together and blend them correctly to make a cohesive scene. You'll also learn how to create lighting effect, work with group and more.
Preview of Final Results

Tutorial Resources
Step 1
Create a new document with size of 1300x800 px and fill it with white (feel free to use your own size and color). Press Cmd/Ctrl+Shift+N to make a new layer. Hit G to active Gradient Tool, choose Radial Gradient with color #022240 and #093b62. Drag a line from the top to bottom to get result below:

Step 2
Open star background pack. I choose "starry 1" and use Move Tool (V) to drag it into our canvas and change the mode to Color Dodge 100%:

Step 3
To change color of some stars I use an adjustment layer with Clipping Mask. On stars layer, go to Layer-New Adjustment Layer-Channel Mixer:

You can see some stars redder:

Step 4
Place aurora image onto the sky and change the mode to Screen 100%:

Click the second button at the bottom of Layer panel to add mask to this layer. Use soft black brush with low opacity (around 20%) to reduce some light on aurora sky. You can see how I did it on the mask and result on picture:

Step 5
Duplicate this layer, flip it horizontally (Edit-Transform-Flip Horizontal) and move to the right.

Use layer mask to remove hard edges and blend it with the rest:

Step 6
To edit all aurora layers together, make all of them selected then press Cmd/Ctrl+G to make a group. Change the mode of this group from Pass Through (default group mode) to Screen 100% (it's very important to keep the effect the same as before grouping). Make a new Curves layer within this group (above all aurora layers):

Because the mode changed to Screen 100% so this Curves layer only affects the layers inside this group (aurora ones).

Step 7
To enhance sky light I make a new layer and use Rectangular Marquee Tool to make a selection on sky part. Use soft brush with two colors (#f79ead,#acbbc5) to paint on the edges of this selection as shown below:

Convert this layer to Smart Object. Go to Filter-Blur-Motion Blur:


Use Cmd/Ctrl+T to rotate and enlarge this part:

Step 8
Use layer mask to blur some parts on the top of this effect:

Change the mode to Hard Light 100% and name this layer "sky light" or whatever you want:

Step 9
Extract left mountain and place it at the left of our picture (you can use your own photo).

Step 10
I use some adjustment layers (Clipping Mask) to darken and change color of this mountain:

On second Curves layer I use soft black brush to erase the left side as I want it to be darker than the rest:

Step 11
I want the contour of this mountain a bit brighter (near the sky) so I make a new layer (Clipping Mask) and use soft brush with color #acbbc5, opacity and flow about 50-55% to paint along the contour:


Step 12
Cut out the right mountain and position it at the right:

Step 13
I use Curves and Color Balance to change color and darken it:
11 comments on “Create a Vivid Winter Aurora Landscape”
Nice article for those people who wants to learn more about photoshop...
I did it: http://ednasnake.deviantart.com/art/Aurora-bear-453281848
nice....
nice tutorial ... thanks
good.......****
photoshop is amazing =)
just awesome thanks for nice tut.
I did it here: http://anne-wipf.deviantart.com/#/art/Winter-Aurora-426736776?hf=1 Thank you! *hugs*
I agree with Chaser
OMG!! What a humongous polar bear!
Not bad for a tut but you need to learn perspective... unless you intentionally decided to make a dinosaur-sized polar bear.
It's intentional... ?
A polar bear in that distance will be a 1 pixel dot.