

Make your artwork look like they're from an alternate universe. These Cyberpunk presets work with Photoshop (via the Camera Raw filter) and Lightroom. Download all 788 presets for 90% off.
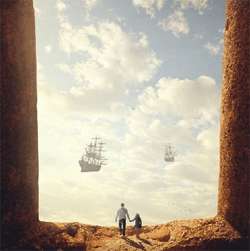
Learn how to create a secret haven in the sky! This Photoshop tutorial will show you how to create this surreal scene where boats pick up travelers and fly them to a secret mountain passage in the sky. This tutorial will show you how to blend images seamlessly and work with lighting and shadows.
Preview of Final Results

Download the PSD
Traveling House.zip | 74.76 MB
Download from Website
How to Create a Fantasy Haven for Travelers in Photoshop
Tutorial Resources
- look through - ronykjose
- Sunset beyond hill 3 - night-fate-stock
- walking together - cornetta
- ship 12 - Alegion Stock
- ship 2 - Alegion Stock
- Swing Stock 2 - shoofly-stock
- bird brushes II - lpdragonfly
- Paper Texture 1 - wojtar stock
Step 1: Create a New Image
We will start by creating a new image file, go to the Menu bar and click File > New, and then input the following values on their respective fields:
- Presets: International Paper
- Size: A4
- Width: 3508 pixels
- Height: 2480 pixels
- Resolution: 300pixels/inch
- Color Mode: RGB Color; 8 bit
- Background Contents: Transparent

Step 2: Create the Foreground
In this Step, we will be creating the foreground of our image, which would be inside of a cavern overseeing the sky. To start, let's open the stock image: 1157664
Once it's open, activate the Move tool by pressing Von your keyboard. Once activated left-click on the stock image and then while the Move tool is activated, drag it to our canvas. Upon moving to our canvas, position it here:

We positioned it there for a reason, now activate the Transform tool (Ctrl/Cmd + T) and then resize it as shown below:

The result:

Next, we would need to distort the image so it would appear symmetrical. To do that, activate the Transform tool (Ctrl/Cmd + T) and then right click on the canvas to show the Transform tool's contextual menu. See image below:

Now, to Distort the image, follow the instructions as shown below:


The result:

Next, let's scale the stock photo up to make it appear more symmetrical. To do that, activate the Transform tool (Ctrl/Cmd + T) and then resize it as shown below:

The result of that should be similar to this:

Now, to balance the width of the walls, we would need to pull the image to the left to make both wall sizes equal or proportioned at least. Activate the Transform tool (Ctrl/Cmd + T) and then resize as shown on the image below:

The result should be similar to this:

Now, we would need to remove the background of this image which we would be replacing with a sky in Step 2. To remove the background from this image, we would need the Polygonal Lasso Tool.

Once the Polygonal Lasso Tool is activated, use it to create a selection area around the background as shown below:
6 comments on “How to Create a Fantasy Haven for Travelers in Photoshop”
I just got a copy of Photoshop and I cannot believe how much a person can do with it. These tutorials are amazing me each step of the way. The program is really in depth.
Oh man, thanks!!! I'm amateur on PS, and you create this good tutorial for our, explaining ever.
Sorry to my English, i'm from Brazil =x
Have a nice Job!!! Thanks!
Thank you very much! It's a really good tutorial. Here my version of it: http://chanelpoulain.deviantart.com/#/art/Fantasy-Heaven-380558934?_sid=3278bf4b
Question: How long did you practice until you were able to make pictures like this by yourself?
Probably years
Thank you so much for this great tutorial explaining every step without having the student loose track of what happened between step 1 and 2...
I made this picture with a picture of myself, and I really learned something about exposure and adjusting lighting in cut in objects! Thanks a lot!
If you want me to send my picture to you, just let me know.
Victoria
What is this man ??? your are a great Teacher. Thanx alot