
Make skin look perfect in one-click with these AI-powered Photoshop actions.
Learn how to create this photo manipulation of a flying man similar to Iron Man. This Photoshop tutorial will show you how to apply cinematic lighting effects and manipulate fire to create this composite.
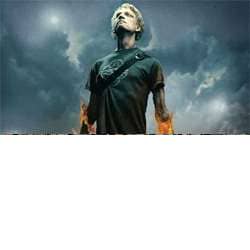
Preview of Final Results
![2 same as 40[3]](https://cdn.photoshoptutorials.ws/images/stories/3ba5d93372cd_FF2B/2sameas403.jpg?strip=all&lossy=1&quality=70&webp=70&avif=70&w=1920&ssl=1 "2 same as 40[3]")
How to Create a Flaming Manipulation Photoshop Tutorial
Step 1 – Select your image
Load the image you want to manipulate (File > Open).


Step 2 – Accentuate the shadows
Select the Burn Tool and use the following settings.
- Range: Midtones
- Exposure: 15%
Burn the areas in the image that have shadows – such as the areas under the eyebrows, the chin, the nose, and the back of the neck. Adjust the brush size to fit the size of the shadow you are burning.


Step 3 – Accentuate the highlights
Select the Dodge tool and dodge the areas exposed to light – such as the forehead and the cheeks. The more detailed your burning and dodging, the better the image will look.

Step 4 – Create a path
Select the pen tool and select “Paths.”

Zoom in to your subject so that you may create an outline with more detail.

Once you have completed the path around your subject, select it (Right click + Select ‘Make Selection). Copy the image (Ctrl+C).

Step 5 – Create a new layer
Create a new layer and paste the image onto the new layer (Ctrl+V). Duplicate the image, just in case. Discard your original image.

")

Step 6 – Open your background image
Load the image for your background. Select the image and drag it into the same window as your subject.

Step 7 – Open your effects image
Load the image for the effects. In this tutorial, we will use flames. Drag the flames into the same window as your subject.


Step 8 – Match the colours
To match the colour of the background to your subject, adjust the Hue and Saturation (Image > Adjustments > Hue and Saturation) to the following settings.
- Hue: 0
- Saturation: -20
- Lightness: 0

Step 9 – Warping the image
Warp (Edit > Free Transform > Warp) the shape so that the flames look like they are coming from the subject’s hands.

Step 10 – Touch up the flames
Select the layer with the flames and make sure it is placed above the layer with the subject.

Use the Eraser Tool to erase the areas surrounding the flames. This way, only the flames will show and it also reveals the subject’s arms as you erase.

Step 11 – Add a Mask Layer
Click “Add Layer Mask” at the bottom of the Layers Palette. Select the brush tool and set the foreground colour to black.


Make sure you select the mask layer to work on.
13 comments on “How to Create a Flaming Manipulation in Photoshop”
Wow💞💞..! I love this site
i like brownies
page 7 was a mad ting
it worked for me thanks!!
Nice but tutorial is not proper
Nice but tutorial is have proper
kul
which software i have to use???
do you make a fake tutorial for readers or what dude??? ZzZzzzz... >,<
what to do after Step 8?? confused!
use screen mode for the black background of the fire
qweewq. Did u turned to the next pages? ~.~"
Not Complete Information